
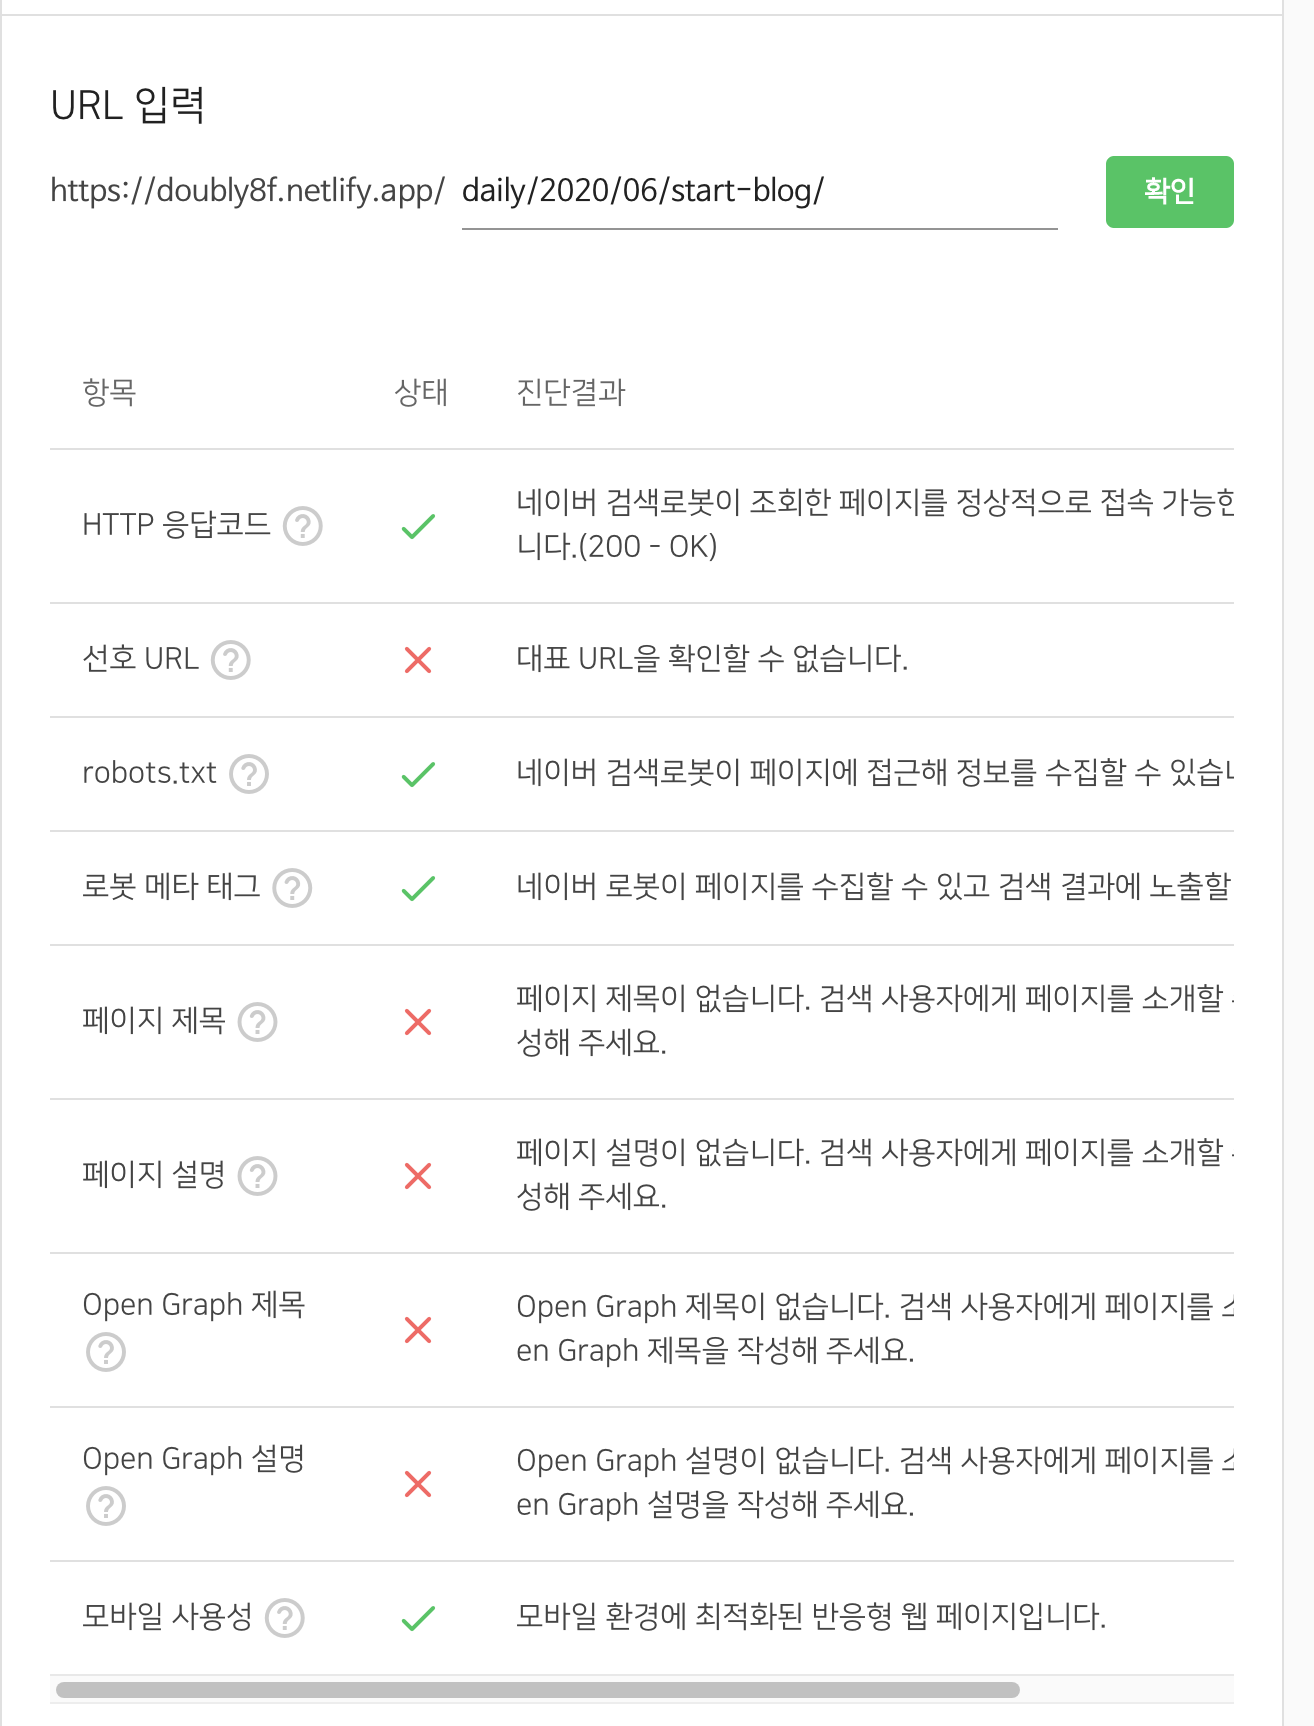
네이버 사이트에 등록하려고 하니 다음과 같이 사이트가 최적화 되어 있지 않다고 상태와 진단 결과를 말해준다.
SEO?
모든 사이트에는 페이지의 제목, favicon, 설명과 같은 기본 메타 태그 <head>요소가 있다. 이 정보들은 브라우저에 표시되며 누군가 나의 사이트를 공유할때 사용이 된다. 예를 들어서 카카오톡을 통해 사이트를 공유할때 더 많은 데이터를 포함시킬 수 있다. 사용자, 검색 엔진에 추가적인 정보를 통해 미리보기가 가능하다. 그 정보들을 모든 페이지에 자동으로 만들어주기 위해서 SEO 생성이 필요하다. SEO를 사용하면 검색엔진 최적화가 되어서 내 사이트의 사용자 환경 및 실적에 상당한 영향을 줄수 있다.
1
2
3
4
5
6
7
8
9
10
11
12
# gatsby-config.js
module.exports = {
  siteMetadata: {
    title: "Severus Snape",
    titleTemplate: "%s · The Real Hero",
    description:
      "Hogwarts Potions master, Head of Slytherin house and former Death Eater.",
    url: "https://www.doe.com", // No trailing slash allowed!
    image: "/images/snape.jpg", // Path to your image you placed in the 'static' folder
    twitterUsername: "@occlumency",
  },
}
SEO component
이렇게 생성된 SEO 컴포넌트는 모든 페이지에서 사용할수 있도록 구현을 한다. 모든 페이지/템플릿에서 SEO를 추가하지 않으면 위에 gatsby-config.js에서 추가한 siteMetadata에 넣은 정보를 매번 사용하게 된다.
1
2
3
4
5
6
7
8
9
10
11
12
13
14
15
16
17
18
19
20
import React from "react"
import PropTypes from "prop-types"
import { Helmet } from "react-helmet"
import { useLocation } from "@reach/router"
import { useStaticQuery, graphql } from "gatsby"

const SEO = ({ title, description, image, article }) => ()
export default SEO
SEO.propTypes = {
  title: PropTypes.string,
  description: PropTypes.string,
  image: PropTypes.string,
  article: PropTypes.bool,
}
SEO.defaultProps = {
  title: null,
  description: null,
  image: null,
  article: false,
}
query를 정의하고 useStaticQuery에 쿼리를 사용하면, 쿼리의 결과를 사용할 수 있다. query items이 여러개가 있는데 그중에 title을 다시 rename해서 defaultTitle로서 사용을 할 수 있다.
1
2
3
4
5
6
7
8
9
10
11
12
13
14
15
16
17
18
19
20
const SEO = ({ title, description, image, article }) => {
  const { location } = useLocation()
  const { site } = useStaticQuery(query)
  return null
}
export default SEO
const query = graphql`
  query SEO {
    site {
      siteMetadata {
        defaultTitle: title
        titleTemplate
        defaultDescription: description
        siteUrl: url
        defaultImage: image
        twitterUsername
      }
    }
  }
`
위에서 쿼리의 결과를 destructure 하고, 사용하지 않는 경우에는 default의 값으로 적용을 한다.
1
2
3
4
5
6
7
8
9
10
11
12
13
14
15
16
17
18
19
20
const SEO = ({ title, description, image, article }) => {
  const { pathname } = useLocation()
  const { site } = useStaticQuery(query)
  const {
    defaultTitle,
    titleTemplate,
    defaultDescription,
    siteUrl,
    defaultImage,
    twitterUsername,
  } = site.siteMetadata
  const seo = {
    title: title || defaultTitle,
    description: description || defaultDescription,
    image: `${siteUrl}${image || defaultImage}`,
    url: `${siteUrl}${pathname}`,
  }
  return null
}
export default SEO
마지막 단계는 Helmet을 사용해서 데이터를 반환하는 것이다. 전체 SEO 구성 요소는 다음과 같아야 한다. 아래 결과가 최종 결과이다. 나는 이해같은거 하기 싫다? 하면 아래 코드를 바로 복사해서 사용하면 문제가 없다. 아래 보면 twitter에 대한 내용이 있는데, 각 사이트마다 정의된게 있는데 OpenGraph의 경우 og를 나타내기 때문에 네이버에서 요구하는 og:title, og:description, title, description은 해결이 가능하다.
1
2
3
4
5
6
7
8
9
10
11
12
13
14
15
16
17
18
19
20
21
22
23
24
25
26
27
28
29
30
31
32
33
34
35
36
37
38
39
40
41
42
43
44
45
46
47
48
49
50
51
52
53
54
55
56
57
58
59
60
61
62
63
64
65
66
67
68
69
70
71
72
73
74
75
76
import React from "react"
import PropTypes from "prop-types"
import { Helmet } from "react-helmet"
import { useLocation } from "@reach/router"
import { useStaticQuery, graphql } from "gatsby"

const SEO = ({ title, description, image, article }) => {
  const { pathname } = useLocation()
  const { site } = useStaticQuery(query)
  const {
    defaultTitle,
    titleTemplate,
    defaultDescription,
    siteUrl,
    defaultImage,
    twitterUsername,
  } = site.siteMetadata

  const seo = {
    title: title || defaultTitle,
    description: description || defaultDescription,
    image: `${siteUrl}${image || defaultImage}`,
    url: `${siteUrl}${pathname}`,
  }

  return (
    <Helmet title={seo.title} titleTemplate={titleTemplate}>
      <meta name="description" content={seo.description} />
      <meta name="image" content={seo.image} />
      {seo.url && <meta property="og:url" content={seo.url} />}
      {(article ? true : null) && <meta property="og:type" content="article" />}
      {seo.title && <meta property="og:title" content={seo.title} />}
      {seo.description && (
        <meta property="og:description" content={seo.description} />
      )}
      {seo.image && <meta property="og:image" content={seo.image} />}
      <meta name="twitter:card" content="summary_large_image" />
      {twitterUsername && (
        <meta name="twitter:creator" content={twitterUsername} />
      )}
      {seo.title && <meta name="twitter:title" content={seo.title} />}
      {seo.description && (
        <meta name="twitter:description" content={seo.description} />
      )}
      {seo.image && <meta name="twitter:image" content={seo.image} />}
    </Helmet>
  )
}

export default SEO
SEO.propTypes = {
  title: PropTypes.string,
  description: PropTypes.string,
  image: PropTypes.string,
  article: PropTypes.bool,
}
SEO.defaultProps = {
  title: null,
  description: null,
  image: null,
  article: false,
}
const query = graphql`
  query SEO {
    site {
      siteMetadata {
        defaultTitle: title
        titleTemplate
        defaultDescription: description
        siteUrl: url
        defaultImage: image
        twitterUsername
      }
    }
  }
`
위와 같이 SEO 컴포넌트를 생성한 이후에 page/templates 에서 아래와 같이 추가해주면 매 페이지마다 자동으로 meta를 생성해서 사용자에게 공유할때 좀더 풍부한 정보 공유가 가능합니다.
1
<SEO title={title} description={excerpt || autoExcerpt} image={coverImage} />
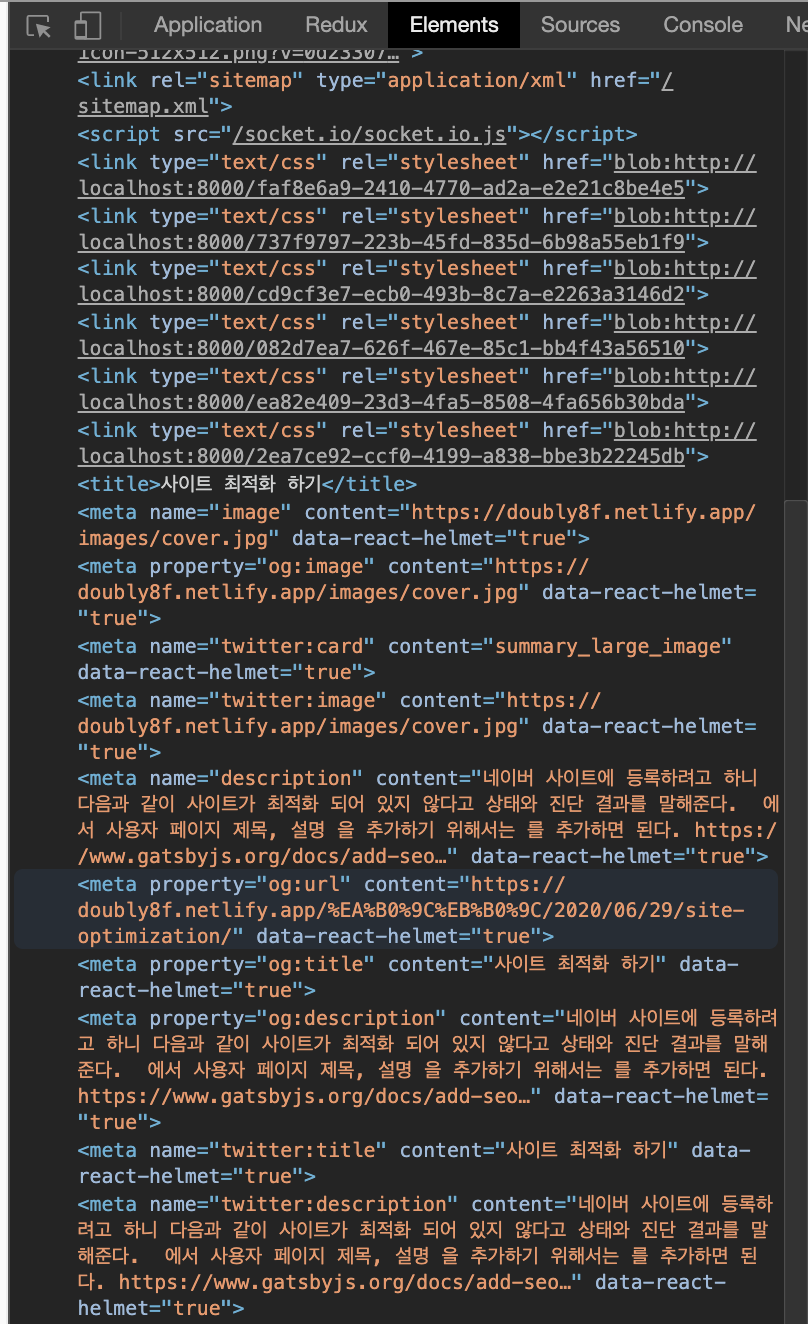
최종 결과를 확인하기 위해서는 Inspect에서 elements를 보면 아래와 같이 추가된 결과를 확인할 수 있습니다.
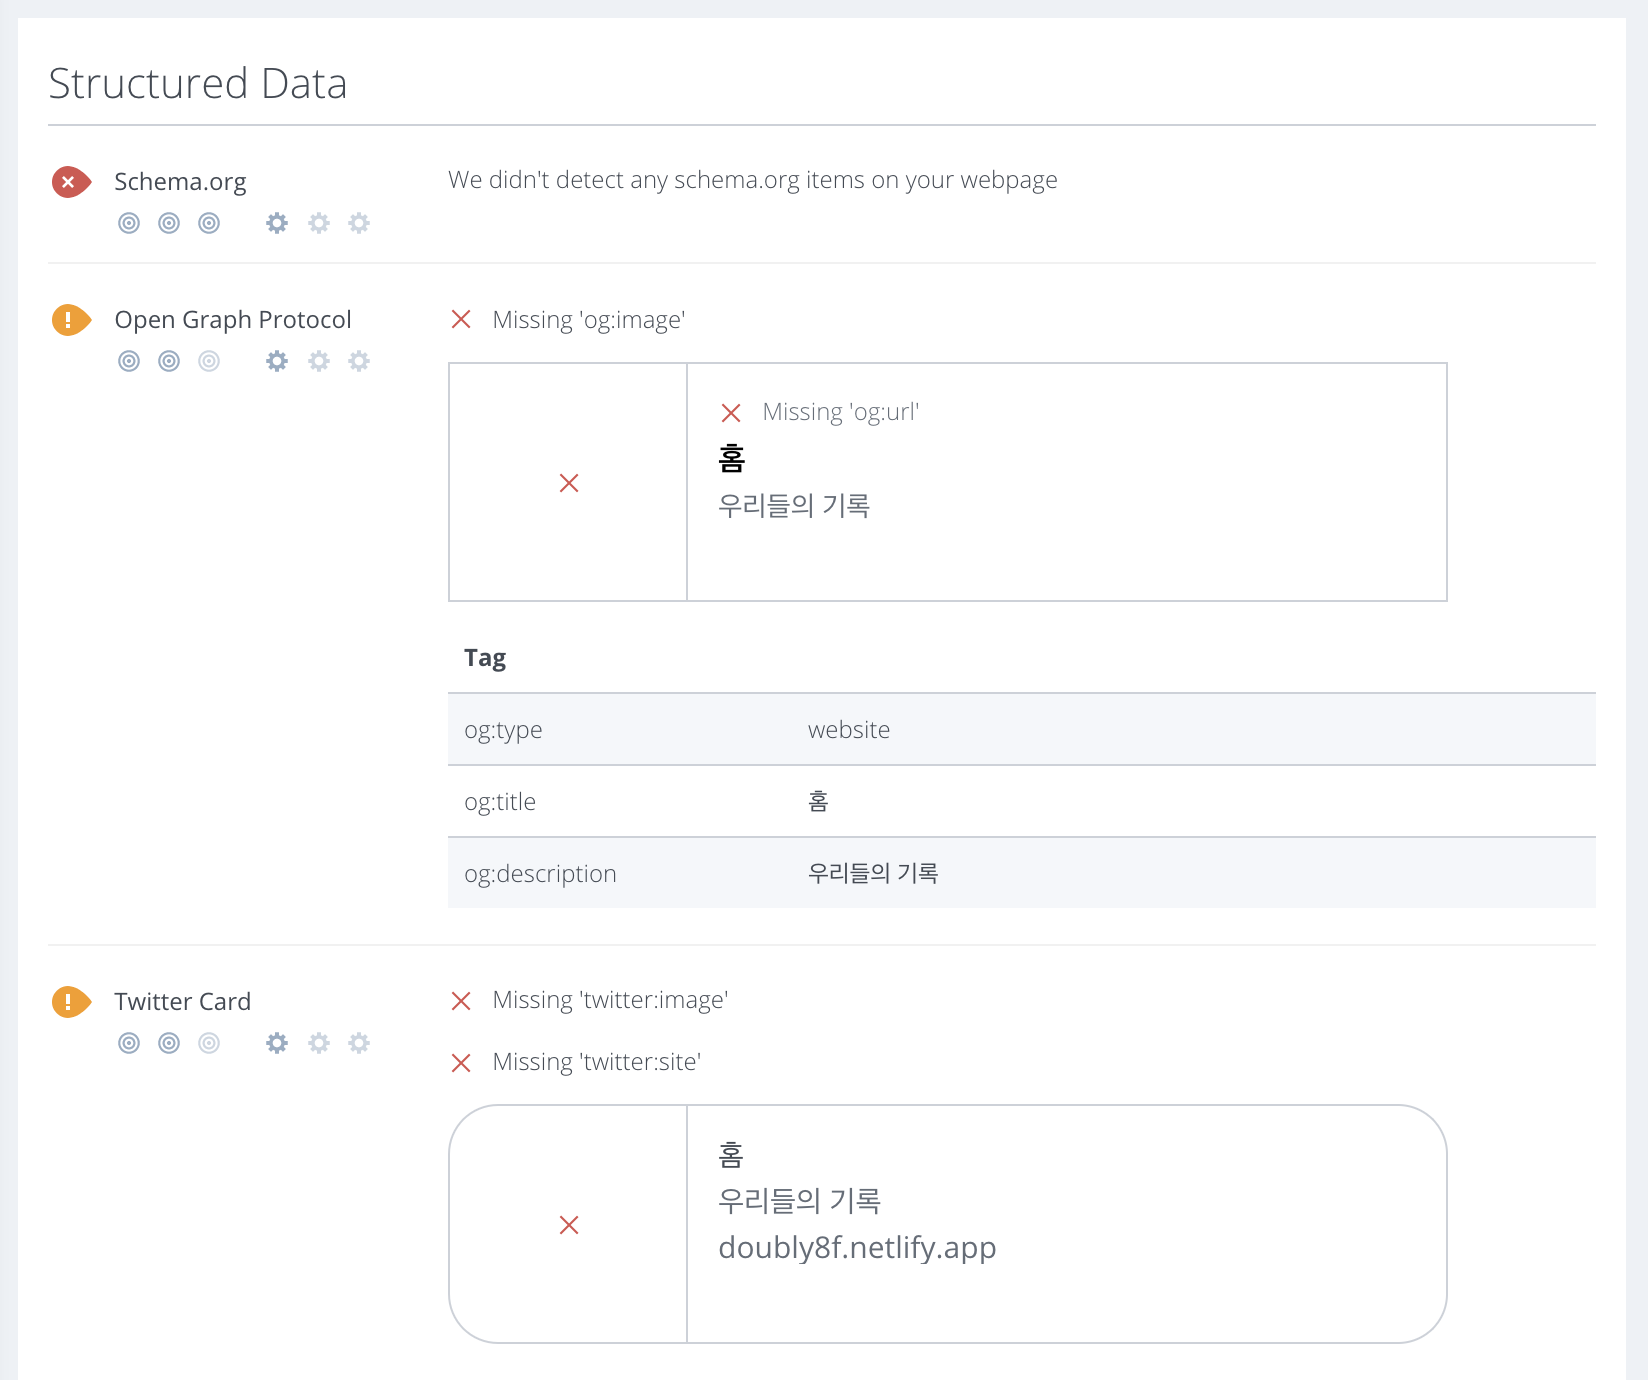
사이트 최종 분석해보기
위에 seo까지 완성이 되었다면 아래 사이트에서 나의 페이지를 검사해보자
https://www.woorank.com/
- 참고
- https://www.gatsbyjs.org/docs/add-seo-component/